 People often ask me about selection and navigation techniques using keyboard shortcuts when I’m teaching Macros in an Advanced Excel course. However, when I’m teaching students how to program for the first time in an Excel VBA course:
Question: How do I select or navigate using Excel VBA?
In this article I’m going to show you some basic techniques on how to go about it.
Before I continue, I will refer to the active cell in 2 ways. In my blog I will use ‘active cell’ which is the correct way to say it in English during my explanations. The second way I will use it is ‘Activecell’. This will be all one word starting with a capital. This is how it is written in Excel VBA.
Firstly, you can record the process using the Excel Macro Recorder. Depending on the outcome you are trying to achieve you may want to record in the macro in absolute or relative mode. If your wondering about the difference between the two modes, the recorder will specifically hard code the cell references that you select during the recording process whereas relative mode will move/select so many rows and columns based on the location of your active cell at the time you run the macro. This is why we call it a relative macro.
To simplify, if you start in cell A1 and record an absolute macro to move to cell A3, the macro recorder would specifically record:
Range(“A3”).Select
i.e. select cell A3.
That means that when you run a macro with this VBA code instruction it will always return to the same location (which in this case is cell A3) no matter where your active cell is located when you run the macro.
Alternatively if you record a macro in relative mode it records the VBA code to move down 2 rows from your current position (aka the active cell):
Activecell.Offset(2,0).Range(“A1”).Select
This basically says, starting from the active cell
Activecell
move down 2 rows
Offset(2,0)
and select 1 cell
Range(“A1”).Select
NB** This is not cell A1. When combine with ‘Activecell.Offset’ Range(“A1”) is how many cells to select relative to the Activecell after you have moved (offset). For instance, if I wanted to move from cell A1 down 5 rows, across 3 columns and then select 3 rows down and 2 columns across then the VBA code would be:
Activecell.Offset(5,3).Range(“A1:B3”).Select

Now that I’ve discussed the basic principles behind recording Absolute and Relative Macros I’d like to move on to some other examples of navigating and selecting data using Excel VBA. If your wondering if you can use the macro recorder to achieve this code than the answer is yes, although I tend to hand code these instructions.
TIP!
Learn your navigational keyboard shortcuts. They come in very handy when recording macros. You can find some of these on our main website: Excel Keyboard Shortcuts
Navigational VBA code:
The next line of VBA code will navigate DOWN to the first or last cell in a block of data. I recorded this using the standard Excel keyboard shortcut of Ctrl + ARROW DOWN
Selection.End(xlDown).Select
If you were currently located at the top of a column of data it will move from the current location (active cell) down to the last cell of unbroken data in the same column. Run it again and it would move down to the first cell in the next block of data. Run it again and it moves to the last cell of the next block of data and so on. If there is no other data in the column it navigates to the very end of the column which is located on row 1,048,576 of the current column.
This will work in any direction if you replace the xlDown with any of the following:
xlUp
xlToLeft
xlToRight
Navigation and Selection VBA Code:
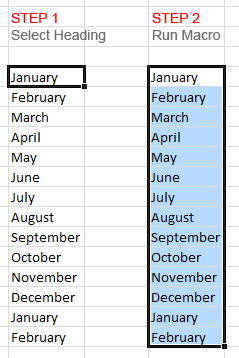
The following line of Excel VBA code will select a column of data as long as there is no blank cells in the column. Select the header or first cell at the top of the column first before running this line of code.
Range(Selection, Selection.End(xlDown)).Select
Again, this will work in any direction if you replace the xlDown with any of the following:
xlUp
xlToLeft
xlToRight
For more information on the Range Object in Excel VBA
In summary, the above 2 lines of VBA code and their variations are a great way to start to learn how to navigate and select data . In my next post on this topic I’ll show you how to select data when the selections are more complex. Most of these will have to be hand coded. If your a beginner, practice these before moving on.
Next Article: Excel VBA Selection and Navigation Techniques – Part 2
Need to learn Excel VBA – Click here for course details